Magento: Product options are wrong if order edit in admin and last order article is taken

15. Juli 2015 at 12:48

php code

If you edit an order and take over last article it is possible that the wrong product options are mapped.

The reason is that the wrong options are taken – not the „options“ taken – magento get the „info_buyRequest“-options from the database, but sometimes the „options“ array has the options data that you need.

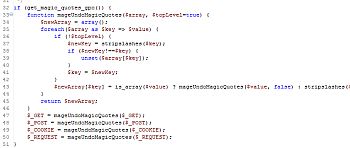
You can solve this problem with overwriting the „getBuyRequest()“ function in app/code/local/Mage/Sales/Model/Order/Item.php with this php code:

/**
 * Returns formatted buy request - object, holding request received from
 * product view page with keys and options for configured product
 *
 * @return Varien_Object
 */
public function getBuyRequest()
{
    $option = $this->getProductOptionByCode('info_buyRequest');   // this get the wrong options
    $option2 = $this->getProductOptionByCode('options');
    foreach($option2 as $option_tmp) {
        if($option_tmp['option_type'] == 'area'
            || $option_tmp['option_type'] == 'file'
            || $option_tmp['option_type'] == 'field'
            || $option_tmp['option_type'] == 'date'
            || $option_tmp['option_type'] == 'date_time'
            || $option_tmp['option_type'] == 'time'
        ) {
            $option['options'][$option_tmp['option_id']] = $option_tmp['value'];
        } elseif($option_tmp['option_type'] == 'drop_down'
            && $option_tmp['label'] == 'Farbe'
            && $productOptions = $this->getProduct()->getOptions()[$option_tmp['option_id']]->getValues()
        ) {
            foreach($productOptions as $productOption) {
                if($productOption->getData('title') == $option_tmp['value']) {
                    $option['options'][$option_tmp['option_id']] = $productOption->getData('option_type_id');
                }
            }
        } else {
            $option['options'][$option_tmp['option_id']][0] = $option_tmp['option_value'];
        }
    }
    unset($option2, $option_tmp, $productModel, $attr);
    if (!$option) {
        $option = array();
    }
    $buyRequest = new Varien_Object($option);
    $buyRequest->setQty($this->getQtyOrdered() * 1);
    return $buyRequest;
}


Please share this article von facebook & google plus or where you want, thank you!

Anonymise Magento database

19. Mai 2015 at 09:39

sql-statement-mysql

to anonymise the magento database you can use the following sql:

--
-- Anonymise Magento database
--
/*!40101 SET @OLD_CHARACTER_SET_CLIENT=@@CHARACTER_SET_CLIENT */;
/*!40101 SET @OLD_CHARACTER_SET_RESULTS=@@CHARACTER_SET_RESULTS */;
/*!40101 SET @OLD_COLLATION_CONNECTION=@@COLLATION_CONNECTION */;
/*!40101 SET NAMES utf8 */;
/*!40103 SET @OLD_TIME_ZONE=@@TIME_ZONE */;
/*!40103 SET TIME_ZONE='+00:00' */;
/*!40014 SET @OLD_UNIQUE_CHECKS=@@UNIQUE_CHECKS, UNIQUE_CHECKS=0 */;
/*!40014 SET @OLD_FOREIGN_KEY_CHECKS=@@FOREIGN_KEY_CHECKS, FOREIGN_KEY_CHECKS=0 */;
/*!40101 SET @OLD_SQL_MODE=@@SQL_MODE, SQL_MODE='NO_AUTO_VALUE_ON_ZERO' */;
/*!40111 SET @OLD_SQL_NOTES=@@SQL_NOTES, SQL_NOTES=0 */;
UPDATE `admin_user` SET
  `firstname` = CONCAT('Firstname-', `user_id`),
  `lastname` = CONCAT('Lastname-', `user_id`),
  `email` = CONCAT('admin-', `user_id`, '@test.com'),
  `username` = CONCAT('username-', `user_id`);
UPDATE `customer_entity` SET
  `email` = CONCAT('email-', `entity_id`, '@test.com');
UPDATE `sales_flat_order` SET
  `customer_firstname` = CONCAT('Firstname-', `customer_id`),
  `customer_middlename` = CONCAT('Middlename-', `customer_id`),
  `customer_lastname` = CONCAT('Lastname-', `customer_id`),
  `customer_email` = CONCAT('email-', `customer_id`, '@test.com');
UPDATE `sales_flat_order_address` SET
  `firstname` = CONCAT('Firstname-', `customer_id`),
  `middlename` = CONCAT('Middlename-', `customer_id`),
  `lastname` = CONCAT('Lastname-', `customer_id`),
  `email` = CONCAT('admin-', `customer_id`, '@test.com');
UPDATE `sales_flat_quote` SET
  `customer_firstname` = CONCAT('Firstname-', `customer_id`),
  `customer_middlename` = CONCAT('Middlename-', `customer_id`),
  `customer_lastname` = CONCAT('Lastname-', `customer_id`),
  `customer_email` = CONCAT('email-', `customer_id`, '@test.com');
UPDATE `sales_flat_quote_address` SET
  `firstname` = CONCAT('Firstname-', `customer_id`),
  `middlename` = CONCAT('Middlename-', `customer_id`),
  `lastname` = CONCAT('Lastname-', `customer_id`),
  `email` = CONCAT('admin-', `customer_id`, '@test.com');
/*!40111 SET SQL_NOTES=@OLD_SQL_NOTES */;
/*!40101 SET COLLATION_CONNECTION=@OLD_COLLATION_CONNECTION */;
/*!40101 SET CHARACTER_SET_RESULTS=@OLD_CHARACTER_SET_RESULTS */;
/*!40101 SET CHARACTER_SET_CLIENT=@OLD_CHARACTER_SET_CLIENT */;
/*!40014 SET UNIQUE_CHECKS=@OLD_UNIQUE_CHECKS */;
/*!40014 SET FOREIGN_KEY_CHECKS=@OLD_FOREIGN_KEY_CHECKS */;
/*!40101 SET SQL_MODE=@OLD_SQL_MODE */;
/*!40103 SET TIME_ZONE=@OLD_TIME_ZONE */;
UNLOCK TABLES;

Please share this article von facebook & google plus or where you want, thank you!

Magento: Move Database Sales, Customers & Invoices

11. Mai 2015 at 16:07

sql-statement-mysql

Disabling Magento during Transfer

First disable magento in the transfer time.
create a blank file named maintenance.flag and place it on the root of your Magento install.

Transferring Customers & Sales

The first step is to transfer all the tables and data starting with „customer_“ and „sales_“, which are as follows on a Magento 1.7.0.2 – 1.9.0.1 install:

‚customer_address_entity‘
‚customer_address_entity_datetime‘
‚customer_address_entity_decimal‘
‚customer_address_entity_int‘
‚customer_address_entity_text‘
‚customer_address_entity_varchar‘
‚customer_eav_attribute‘
‚customer_eav_attribute_website‘
‚customer_entity‘
‚customer_entity_datetime‘
‚customer_entity_decimal‘
‚customer_entity_int‘
‚customer_entity_text‘
‚customer_entity_varchar‘
‚customer_form_attribute‘
‚customer_group‘

 And now export the data from the „sales_“ tables:

„sales_bestsellers_aggregated_daily“
„sales_bestsellers_aggregated_monthly“
„sales_bestsellers_aggregated_yearly“
„sales_billing_agreement“
„sales_billing_agreement_order“
„sales_flat_creditmemo“
„sales_flat_creditmemo_comment“
„sales_flat_creditmemo_grid“
„sales_flat_creditmemo_item“
„sales_flat_invoice“
„sales_flat_invoice_comment“
„sales_flat_invoice_grid“
„sales_flat_invoice_item“
„sales_flat_order“
„sales_flat_order_address“
„sales_flat_order_grid“
„sales_flat_order_item“
„sales_flat_order_payment“
„sales_flat_order_status_history“
„sales_flat_quote“
„sales_flat_quote_address“
„sales_flat_quote_address_item“
„sales_flat_quote_item“
„sales_flat_quote_item_option“
„sales_flat_quote_payment“
„sales_flat_quote_shipping_rate“
„sales_flat_shipment“
„sales_flat_shipment_comment“
„sales_flat_shipment_grid“
„sales_flat_shipment_item“
„sales_flat_shipment_track“
„sales_invoiced_aggregated“
„sales_invoiced_aggregated_order“
„sales_order_aggregated_created“
„sales_order_aggregated_updated“
„sales_order_status“
„sales_order_status_label“
„sales_order_status_state“
„sales_order_tax“
„sales_order_tax_item“
„sales_payment_transaction“
„sales_recurring_profile“
„sales_recurring_profile_order“
„sales_refunded_aggregated“
„sales_refunded_aggregated_order“
„sales_shipping_aggregated“
„sales_shipping_aggregated_order“
„salesrule“
„salesrule_coupon“
„salesrule_coupon_usage“
„salesrule_customer“
„salesrule_customer_group“
„salesrule_label“
„salesrule_product_attribute“
„salesrule_website“

Change Last Order ID for Sales

Next, a step that is fairly easy, but that is often missed is the changing of the last entity ID for orders, invoices, credit memos and shipments. Otherwise, Magento will ignore the sales data that did not exist prior to the transfer.
For example: Imagine a Magento store has 9 orders (both development and production), the last orders‘ id would probably be 100000009.

During development, your production website acquires 3 additional orders (a total of 12 orders).

After moving your live sites‘ sales_ tables, your development site will reflect the 12 orders correctly, but will still count from 9, instead of 12.

Hence, the next order will have an ID of 100000010 instead of 100000013, unless the last order ID is updated. The same applies for invoices, shipping and credit memos.

The fix is simple! Simply edit the table eav_entity_store and update the increment_last_id column with the last id used for each row. Each rows‘ entity type can be found in the table eav_entity_type. Default the entity types in Magento are:

    5 = order
    6 = invoice
    7 = creditmemo
    8 = shipment

That should be all that’s needed for a simple customer and sales update on two, otherwise identical Magento 1.7.0.2 – 1.9.0.1 sites.

Please share this article von facebook & google plus or where you want, thank you!

Magento: Save admin name to order_status change using an Observer

28. April 2015 at 15:24

php code

config.xml:

<adminhtml>
  <events>
    <sales_order_status_history_save_before>
      <observers>
        <module_status_history_save_before>
          <class>module/observer</class>
          <method>addUserNameBeforeComment</method>
        </module_status_history_save_before>
      </observers>
    </sales_order_status_history_save_before>
  </events>
</adminhtml>

Observer.php:

public function addUserNameBeforeComment($observer)
{
        $data = '<strong>' . Mage::getSingleton('admin/session')->getUser()->getFirstname() . ' ' . Mage::getSingleton('admin/session')->getUser()->getLastname() . ': </strong>';
        $history = Mage::app()->getRequest()->getPost('history');
        if ($history && isset($history['comment']) && $history['comment'] != '') {
            $history['comment'] = $data . $history['comment'];
            Mage::app()->getRequest()->setPost('history', $history);
        }
}


Please share this article von facebook & google plus or where you want, thank you!

MySQL Query Sammlung / MySQL Query Library

8. April 2015 at 17:34

sql-statement-mysql

Some MySQL Querys which you need by the programming with php / mysql or  magento:

MySQL Update with sub-select: Update a value of an option, e.g. „price“, where option-name is like „optionname“

UPDATE catalog_product_option_type_price t1
SET t1.price='30'
WHERE t1.option_type_id in (SELECT option_type_id FROM catalog_product_option_type_title WHERE `title` like '%optionname%');

Other example with an own table where are not all product_id’s imported and must be updated by sku

UPDATE mypharmacy_stock_statistical_data t2,
(   SELECT entity_id,sku
    FROM catalog_product_entity
) t1
SET t2.product_id = t1.entity_id
WHERE t1.sku=t2.sku

Please share this article von facebook & google plus or where you want, thank you!

Magento: Cancel old orders / Alte Bestellungen stornieren

24. März 2015 at 15:18

php code

Um alte Bestellungen in Magento zu stornieren könnt ihr den folgenden php-code verwenden:

To cancel old orders in Magento, e.g. with state „pending“, „holded“ or „pending_payment“ you can use the following php-code:

    public function autocancelPendingOrders()
    {
        $orderCollection = Mage::getResourceModel('sales/order_collection');
        $orderCollection
            ->addFieldToFilter('state',
                array(
                    array('eq' => 'pending'),
                    array('eq' => 'holded'),
                    array('eq' => 'pending_payment')
                ));
        $orderCollection->addFieldToFilter('created_at', array(
                'lt' =>  new Zend_Db_Expr("DATE_ADD('".now()."', INTERVAL 2 HOUR)")))
            ->getSelect()
            ->order('entity_id')
//            ->limit(20)
            ;
        foreach($orderCollection->getItems() as $order)
        {
            $orderModel = Mage::getModel('sales/order');
            $orderModel->load($order['entity_id']);
            if($orderModel->getState() == 'holded') {
                if(!$orderModel->canUnhold()) {
                    continue;
                } else {
                    $orderModel->unhold();
                    $orderModel->setStatus('new');
                }
            }
            if(!$orderModel->canCancel()) {
                continue;
            }
            $orderModel->cancel();
            $orderModel->setStatus('canceled');
            $orderModel->save();
        }
    }

Magento: Test order email with filled variables

20. Februar 2015 at 10:13

magento ecommerce logo

If you would edit order emails you can use the following code to check the order emails with filled variables with order data:

<?php
require_once 'app/Mage.php';
Mage::app();
// loads the proper email template
$emailTemplate  = Mage::getModel('core/email_template')
    ->loadDefault('sales_email_order_template');
$templateId = "Neue Bestellung (Template)";
$emailTemplate = Mage::getModel('core/email_template')->loadByCode($templateId);
// All variables your error log tells you that are missing can be placed like this:
$emailTemplateVars = array();
$emailTemplateVars['usermessage'] = "test message";
$emailTemplateVars['store'] = Mage::app()->getStore();
$emailTemplateVars['sendername'] = 'sender name';
$emailTemplateVars['receivername'] = 'receiver name';
// order you want to load by ID
$emailTemplateVars['order'] = Mage::getModel('sales/order')->load(673);
// load payment details:
// usually rendered by this template:
// web/app/design/frontend/base/default/template/payment/info/default.phtml
$paymentBlock = Mage::helper('payment')->getInfoBlock($emailTemplateVars['order']->getPayment())
    ->setIsSecureMode(true);
$paymentBlock->getMethod()->setStore(Mage::app()->getStore());
$emailTemplateVars['payment_html'] = $paymentBlock->toHtml();
//displays the rendered email template
echo $emailTemplate->getProcessedTemplate($emailTemplateVars);
// you can send this email template
$receiveName = 'Daniel Briegert';
$receiveEmail = 'test@test.com';
//$emailTemplate->send($receiveEmail,$receiveName, $vars);


Please share this article von facebook & google plus or where you want, thank you!

Handling Magento errors

20. Januar 2015 at 09:35

magento ecommerce logo

Magento ships with a new feature, which effectively hides errors from your visitors. If some kind of error occurs – a PHP Fatal Error, or PHP Notice Error, or database error – the actual error is written to file and not shown on screen. But when developing Magento sites, this behaviour might actually become annoying. Luckily you can easily re-enable the error-displaying again.

Showing errors anyway

Displaying the error on screen is much easier to work with. To enable the error-displaying again, navigate to the errors-folder in the Magento root, and rename the file local.xml.sample to local.xml. The XML-file should contain a line similar to this:

 <skin>myskin</skin> 

You can see that the action here is configured to print the message on screen, while the original dump is also left on the filesystem (in var/cache). You could also change the XML-code a bit to remove the dump-file instead:

 <trash>delete</trash> 

Mail me if an error occurs

Even cooler is that the XML-code also allows you to define an email-address to which mail should be sent if some error occurs:

<config>
<skin>default</skin>
<report>
<action>email</action>
<subject>Whoops, something went wrong in Magento</subject>
<email_address>info@example.com</email_address>
<trash>delete</trash>
</report>
</config>

Those of you who have wondered why errors were displayed using the original skin, can also see that the skin can be changed as well here:

<skin>myskin</skin>

Hope you find this all usefull.

Please share this article von facebook & google plus or where you want, thank you!

If your Magento Admin Backend is down by activated the magento compiler mode

19. Januar 2015 at 14:06

magento ecommerce logo

If your Magento Admin Backend is down by activated the magento compiler mode,
here some reasons and solutions.

A possible reason is an active compilation status, check it about the console/bash/ssh
and if it is active, Disabling Magento compiler when Magento Admin Backend is inaccessible / down.

The Solution to deactivate the compiler mode

Console/SSH

    Check current compilation status

$ php -f shell/compiler.php — state
Compiler Status:          Enabled
Compilation State:        Compiled
Collected Files Count:    8764
Compiled Scopes Count:    4

    Disable Magento compilation:

$ php -f shell/compiler.php — disable
Compiler include path disabled

   Clear all compiled files

$ php -f shell/compiler.php — clear
Compilation successfully cleared

    Ensure that compiler is disabled now by checking its status:

$ php -f shell/compiler.php — state
Compiler Status:          Disabled
Compilation State:        Not Compiled
Collected Files Count:    0
Compiled Scopes Count:    0

   Flush Magento cache

Very often installation of new extensions with Compilation Mode enabled breaks your site. You cannot view the front-end and back-end. Nothing works. In this case the only solution is to disable Compilation Mode to get the site back to normal state.

1) Connect to your server using FTP Manager

2) Go inside „includes“ folder

3) Open the file „config.php“ for editing

4) Find the lines:

define(’COMPILER_INCLUDE_PATH’, dirname(__FILE__).DIRECTORY_SEPARATOR.’src’);
#define(’COMPILER_COLLECT_PATH’, dirname(__FILE__).DIRECTORY_SEPARATOR.’stat’);

and comment them out:

#define(’COMPILER_INCLUDE_PATH’, dirname(__FILE__).DIRECTORY_SEPARATOR.’src’);
#define(’COMPILER_COLLECT_PATH’, dirname(__FILE__).DIRECTORY_SEPARATOR.’stat’);

5) Save the changes.

Now you can get into your back-end. If you need to enable the Compilation mode again you should use „Run Compilation“ button and NOT just enable it again (as it will break your site again). Running it will compile all new files correctly.

or the other way

FTP/Filemanager/Filesystem

delete includes directory or rename it to any other name (_includes.unused for example):

ftp :~> mv ./includes ./includes.unused

Flush Magento cache

Please share this article von facebook & google plus or where you want, thank you!

Magento: DHL Intraship-Modul Netresearch korrekt konfigurieren

13. Januar 2015 at 12:34

magento-intraship-module-connect-screenshot

Das Magento Intraship-Module

Das von DHL angebotene Intraship-Module von Netresearch macht ggf. Probleme bei der Verwendung über das neue VLS 2.0.

Laut DHL wird Intraship derzeit abgelöst und durch das neue VLS 2.0 Versand-System ersetzt.

Das Magento-Module könnt ihr kostenfrei laden über den Magento-Connect-Manager, selbiges findet ihr hier:

http://www.magentocommerce.com/magento-connect/dhl-intraship.html

Bei dem Intraship-User tragt ihr ein im DHL-Geschäftskundenportal angelegten Benutzer an. Laut DHL-Support darf dieser nur max. 8 Zeichen haben. Das dazugehörige Passwort hinterlegt ihr bei Intraship Passwort.

Bei EKP tragt ihr die DHL-Kundennummer.

Die „Halbautomatische Sendungserstellung“ sollte auf „Ja“ gestelt werden (daher Aktiviert: ja).

Fehlermeldungen

Erhaltet ihr eine Fehlermeldung ähnlich

„Hard validation error occured. | hard validation error occured. | die ausgewählte abrechnungsnummer steht nicht zur verfügung. | die ausgewählte abrechnungsnummer steht nicht zur verfügung.“

so ist höchstwahrscheinlich die hinterlegte Abrechnungsnummer falsch.

Diese findet ihr im DHL-Geschäftskundenportal unter „Verwalten -> Stammdaten“.
Die dort angezeigte Abrechnungsnummer (14-stellig, z.b. 6XXXXXXXXXXXXX) muss in Magento bei der Konfiguration des DHL-Moduls jeweils bei den Versandoptionen im Feld DHL Paket – Teilnahme eingetragen werden.
WICHTIG: Da das Module nur zweistellige Zahlen erlaubt, müsst ihr die system.xml Konfiguration anpassen, daher die Datei

app/code/community/Dhl/Intraship/etc/system.xml wie folgt ändern:

<pre><standard translate="label comment" module="intraship">
    <label>DHL Package - Participation</label>
    <frontend_type>text</frontend_type>
    <validate>validate-digits validate-length minimum-length-14 maximum-length-14</validate>
    <sort_order>15</sort_order>
    <show_in_default>1</show_in_default>
    <show_in_website>0</show_in_website>
    <show_in_store>0</show_in_store>
</standard></pre>

Erhaltet ihr eine Fehlermeldung ähnlich

Invalid fieldlength in element ‚PartnerID‘. Please refer to documentation.

so ist die Partner-ID falsch. Diese ist in der Regel entweder 01 oder 02.

Sollte diese nicht korrekt aus der Konfig ausgelesen werden, so könnt ihr diese in der Datei

app/code/community/Dhl/Intraship/Model/Config.php in Zeile 402 setzen bzw. aus der Konfig auslesen, z.b. durch:

<pre>$partnerId = '02';
$profile->offsetSet('partnerId', $partnerId);</pre>

Schnittstellen-URLs

Die Schnittstellen-URLs sollten von dem Module schon vorkonfiguriert sein, falls nicht sind diese wie folgt:

Login Produktiv: https://www.intraship.de/intraship/jsp/Login_WS.jsp
Login Test: https://test-intraship.dhl.com/intra…p/Login_WS.jsp
WSDL Produktiv: http://www.intraship.de/ws/1_0/ISService/DE.wsdl
WSDL Test: http://test-intraship.dhl.com/ws/1_0/ISService/DE.wsdl

Support

Den Intraship-Module Support erreicht ihr per E-Mail an dhl.support@nr-apps.com

Please share this article von facebook & google plus or where you want, thank you!